How to auto-ingest data into Snowflake with Azure Blob Containers and Snowflake’s Snowpipe
Data integration is one of the first things that companies have to deal with when setting up their Snowflake cloud data warehouse. If you do not employ an ELT tool like Fivetran, Rivery or Stitch, you end up having to find a different solution. The best and most common solution in that case, is to utilize Snowflake’s Snowpipe in conjunction with one of three possible external storage locations (Azure Blob Storage, Google Cloud Storage or AWS S3).
This blog post covers the setup of a continuous data ingestion pipeline with Azure Blob Containers and Snowflake’s Snowpipe feature. Snowflake provides basic documentation on this topic. However, the instructions on Azure side utilize the CLI (Command Client Interface) of Azure and only list the commands to be executed in order to create the necessary resources in Azure. I have seen many companies who’d rather use the browser portal to create these resources. And therefore, this post explains the steps to take on the browser portal side as well as all steps needed on Snowflake side.
General Steps
- Create an Azure Resource Group
- Create an Azure Storage Account
- Create Azure Container inside Storage Account
- Create Azure Queue inside Storage Account
- Create Azure Event Grid Subscription + link to Queue
- Create Snowflake Storage Integration
- Approve Snowflake Storage Integration app access to Azure
- Assign necessary roles to Snowflake app in Azure
- Create Snowflake Notification Integration
- Approve Snowflake Notification Integration app access to Azure
- Assign necessary roles to Snowflake app in Azure
- Create Snowflake External Stage
- Upload simple csv file to Azure storage container
- Run ls @<stage_name> in Snowflake to see files in container
- Create landing table with matching schema in Snowflake
- Create Snowpipe
- Refresh Snowpipe to run the data ingestion
- Check if data was loaded into target table in Snowflake
- Upload new csv file to Azure storage container
- Check if data was auto-ingested into target table in Snowflake
General Assumptions
This blog post assumes that you have already created a Resource Group as well as a Storage Account (general-purpose v2 account) in your Azure account.
Furthermore, you need to have the account admin role in Azure to complete some of the steps necessary to create the integration between Azure and Snowflake.
Let’s dive into it.
Step-by-Step Guide
Create Basic Azure Resources
- Go to the Resource Group that you created for your Snowflake data integration project
- Go to the Storage Account that you created for your Snowflake data integration project (the storage account should have been created as ‘Standard: general-purpose v2 account)
- Create a new Container inside your Storage Account
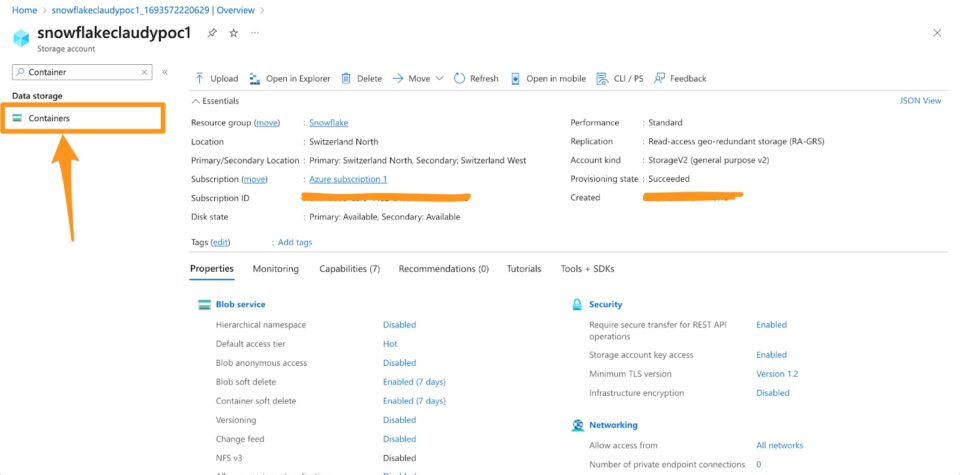
Creating a New Blob Container in Azure Portal - Look for “Containers” in your Storage Account and click on it
- Click on + Container in the menu bar to the top
- Provide a useful name (eg. “claudy-snowflake-ingestion-container-v1”)
- Anonymous access level set to “Private”
- Create
- Create a new Queue (having one queue per Storage Account is the best practice for Snowflake)
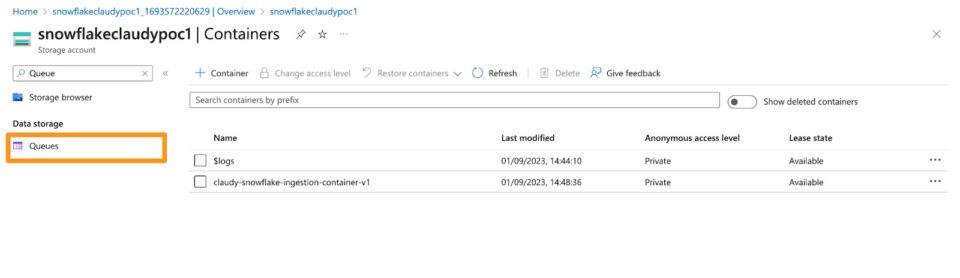
Creating a New Storage Queue in Azure Portal - Look for “Queues” in your Storage Account and click on it
- Click on + Queue in the menu bar to the top
- Provide a useful name (eg. “claudy-snowflake-ingestion-queue-v1”)
- Click OK
- Create an Event Grid Subscription
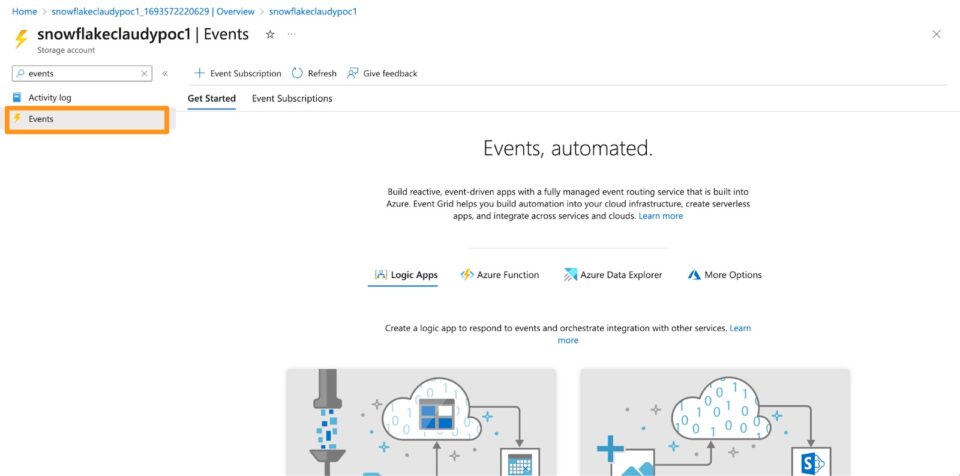
Creating an Event Grid Subscription in Azure Portal - Go back to the storage account and look for “Events” in the services list on the left-hand side
- Click on + Event Subscription in the menu bar to the top
- Provide a useful name (eg. “claudy-snowflake-ingestion-event-v1”)
- If you create this for the first time in your storage account, you have to provide a ‘System Topic Name’ – provide a useful name here (eg. “claudy-snowflake-ingestion-topic”)
- Under Endpoint Details, select “Storage Queues” from the Endpoint Type dropdown and then select the Storage Queue you created in the previous step as the endpoint
- Leave the rest as is. Your final page should look something like this:
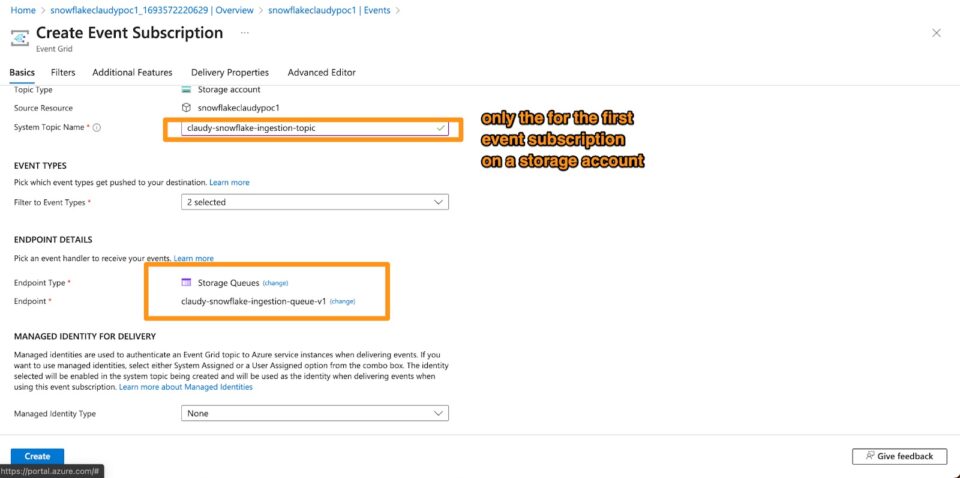
Final Page of Creating Event Subscription - Click Create
- When you create this for the first time, it could happen that you run into the following error message:
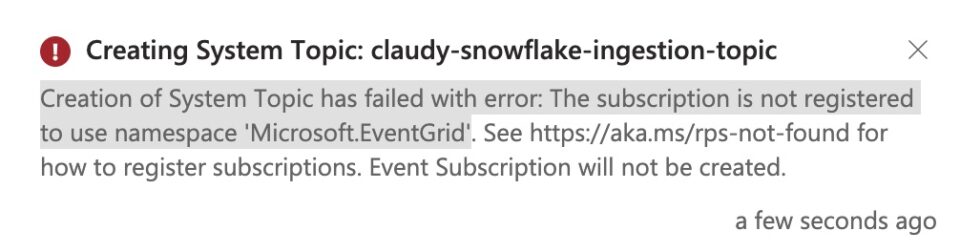
Azure Event Error Message Resource Provisioning - In that case, follow the few steps explained in this article to solve the problem
- If you cannot read the full article, open Azure Portal Home in a new tab > Subscriptions > Select the Subscription you use for this Snowflake project > Select ‘Resource Providers’ from the list of options on the left side > look for “Microsoft.EventGrid” in the search bar > select the service > click on Register in the menu bar to the top > wait for the resource to be registered
- After that, go back to your Event Grid Subscription and click on Create again
Create Integrations in Snowflake and Grant the Necessary Roles in Azure
First, let’s create the STORAGE INTEGRATION in Snowflake.
We will use the CREATE STORAGE INTEGRATION statement in Snowflake (make sure you have selected a role with the necessary grants to create an integration. If you’re unsure, select the ACCOUNTADMIN role)
For that, you need two things from Azure:
- Azure Active Directory Tenant ID (you’ve got to have an Azure AD tenant created in Azure Portal that is used for authentication federation with Microsoft)
- Go to your Azure Active Directory
- Select the Azure AD you want to use for the Snowflake project
- Copy and note the Tenant ID
- URL of your Azure Blob Container
- Go to your Storage Account
- Go to Containers
- Click on the Container you created earlier
- Click on Properties on the left-hand side
- Copy and note the URL
- Then go to Snowflake and create a new SQL worksheet
- Execute the following command but be sure to replace the parameters with the values you noted from Azure Portal as well as to provide a useful name for your integration:
CREATE STORAGE INTEGRATION <name_of_your_integration> TYPE = EXTERNAL_STAGE STORAGE_PROVIDER = 'AZURE' ENABLED = TRUE AZURE_TENANT_ID = '<tenant-id>' STORAGE_ALLOWED_LOCATIONS = ('azure://<account>.blob.core.windows.net/<container>/<path>/');- Be sure to enclose the values with the apostrophe “ ‘ “
- On the STORAGE_ALLOWED_LOCATIONS, be sure to paste the URL without the “https://” after the “azure://”
- If you paste the location URL of the container without any further path, you will get access to all files uploaded to this container in the future (check out Snowflake’s documentation on allowed and blocked locations)
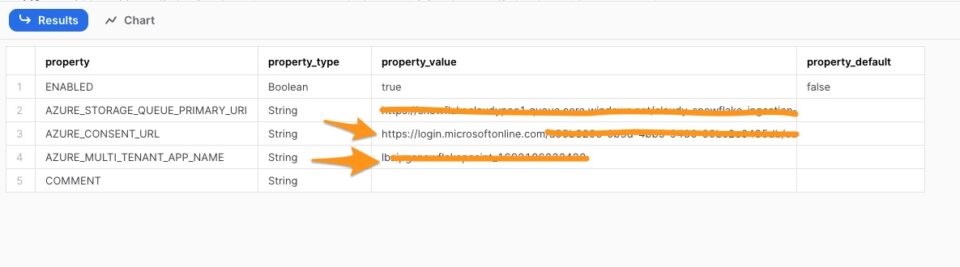
- After you created the storage integration successfully, run the command DESC STORAGE INTEGRATION <NAME_OF_YOUR_STORAGE_INTEGRATION>; and put the name of your storage integration
- From the output copy and note the values for the AZURE_CONSENT_URL and the AZURE_MULTI_TENANT_APP_NAME

Snowflake Describe Storage Integration Command - Copy and paste the AZURE_CONSENT_URL into a new browser window and accept the permission request – be sure to check the box on “Consent on behalf of your organization”
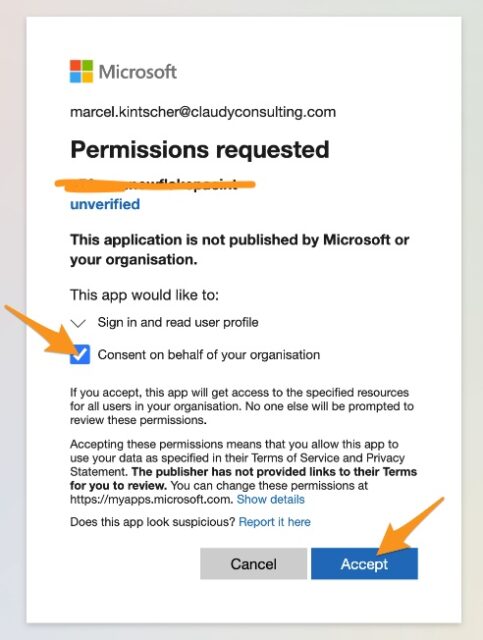
Snowflake Storage Integration Consent Page - You will be forwarded to Snowflake’s official website, you can close this tab
Next, let’s grant the necessary roles to the Snowflake Storage Integration App on the Storage Account in Azure.
- Go to your Storage Account in Azure
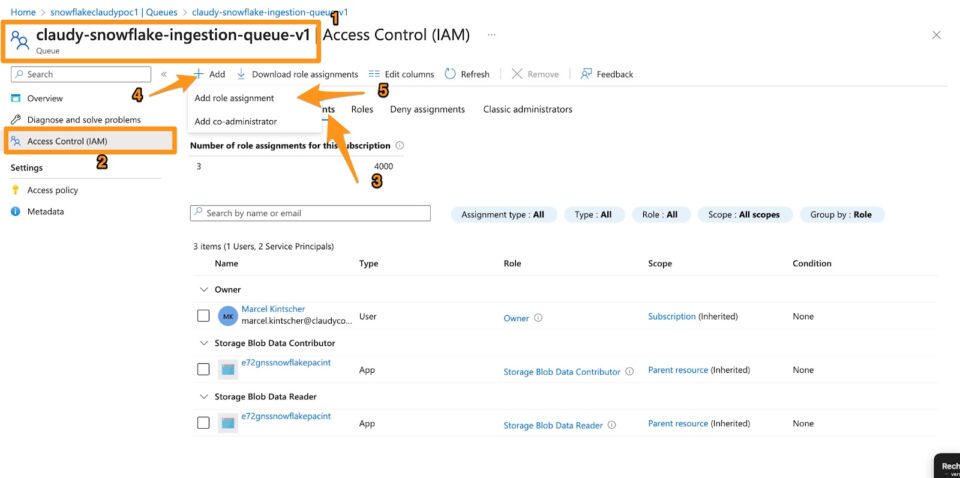
- Look for “IAM” and click on Access Control (IAM)
- Click on the tab “Role assignments”
- Click on + Add and then on Add role assignment
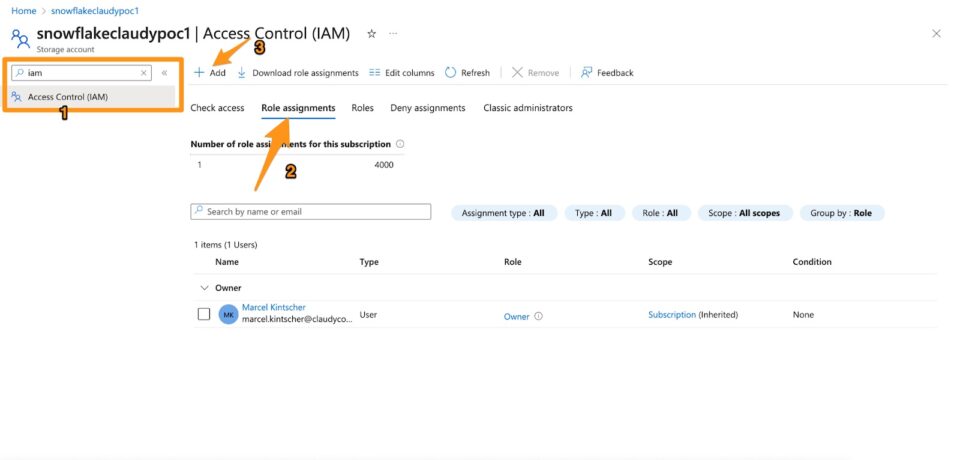
Storage Integration Role Assignment in Azure Portal - You have to at least grant the Storage Blob Data Reader role. But if you want to utilise Snowflake to regularly clean up your container by removing files, you also have to add the Storage Blob Data Contributor role.
- Look for “Storage Blob Data Reader” by using the search bar and click on the role to highlight it
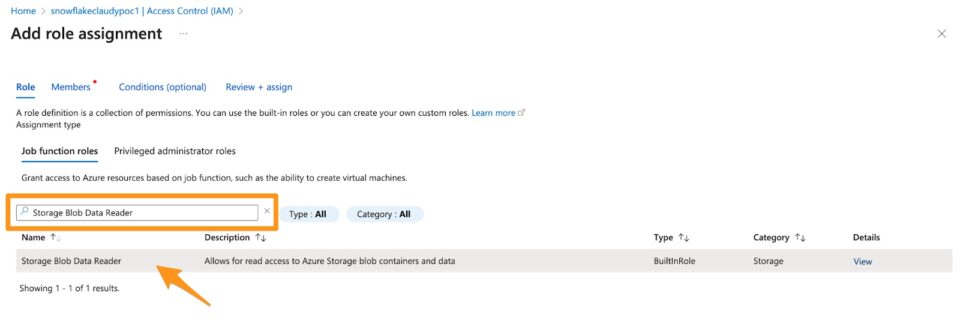
Storage Integration Role Assignment – Search for „Storage Blob Data Reader“ - Click on Next at the bottom
- Select User, group, or service principal
- Click on + Select members and look for the previously created Snowflake app by pasting the part before the underscore (“_”) of the previously noted AZURE_MULTI_TENANT_APP_NAME
- Click on the app and click Select at the bottom
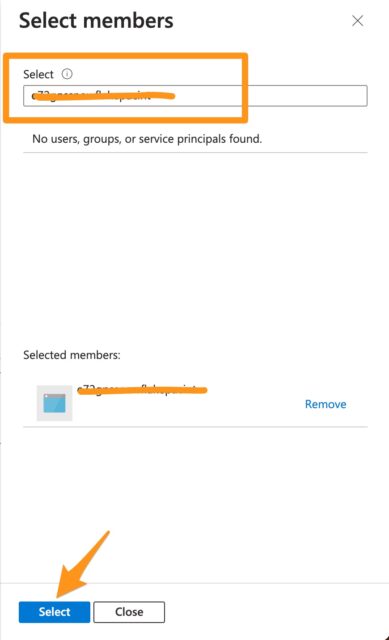
Storage Integration Role Assignment – Add Snowflake App - Click on Review + assign and then Review + assign again
- OPTIONAL: In case you want to be able to remove files from the container from inside Snowflake, you have to repeat the above steps for the Storage Blob Data Contributor role.
- Look for “Storage Blob Data Reader” by using the search bar and click on the role to highlight it
Now it’s time to create the NOTIFICATION INTEGRATION in Snowflake that is utilized for triggering the Snowpipe ingestion job as soon as a new file gets uploaded to the Azure Blob Container.
We will use the CREATE NOTIFICATION INTEGRATION statement in Snowflake (make sure you have selected a role with the necessary grants to create an integration. If you’re unsure, select the ACCOUNTADMIN role)
For that, you need again two things from Azure:
- Azure Active Directory Tenant ID (same as before)
- Go to your Azure Active Directory
- Select the Azure AD you want to use for the Snowflake project
- Copy and note the Tenant ID
- URL of the Azure Storage Queue
- Go to your Storage Account
- Go to Queues
- Copy and note the Url value next to the Storage Queue you created earlier
- Then go back to your SQL worksheet in Snowflake and run the following command – be sure to replace the <queue_url> and the <tenant_id> with the respective values you noted in the step before as well as to provide a useful name
CREATE NOTIFICATION INTEGRATION <name_of_your_integration>
  ENABLED = true
  TYPE = QUEUE
  NOTIFICATION_PROVIDER = AZURE_STORAGE_QUEUE
  AZURE_STORAGE_QUEUE_PRIMARY_URI = '<queue_URL>'
  AZURE_TENANT_ID = '<directory_ID>';
- After you created the NOTIFICATION INTEGRATION successfully, run the command DESC NOTIFICATION INTEGRATION <NAME_OF_YOUR_INTEGRATION>; and put the name of your notification integration
- From the output copy and note the values for the AZURE_CONSENT_URL and the AZURE_MULTI_TENANT_APP_NAME
Snowflake Describe Notification Integration - Copy and paste the AZURE_CONSENT_URL into a new browser window and accept the permission request – be sure to check the box on “Consent on behalf of your organization”

Snowflake Notification Integration Consent Page - You will be forwarded to Snowflake’s official website, you can close this tab
Next, let’s grant the necessary roles to the Snowflake Notification Integration App on the Storage Account in Azure.
- Go to your Storage Account in Azure
- Go to Queues and click on the queue you created earlier
- Click on Access Control (IAM) on the left side
- Click on the tab “Role assignments”
- Click on + Add and then on Add role assignment
Notification Integration Role Assignment in Azure Portal - You have to grant the Storage Queue Data Contributor role to the Snowflake Notification Integration App you created before
- Look for “Storage Queue Data Contributor” by using the search bar and click on the role to highlight it
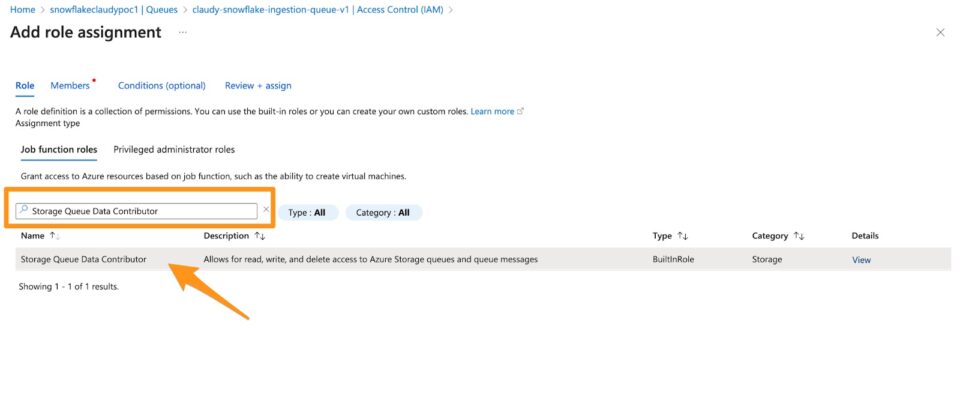
Notification Integration Role Assignment Search for „Storage Queue Data Contributor“ - Click on Next at the bottom
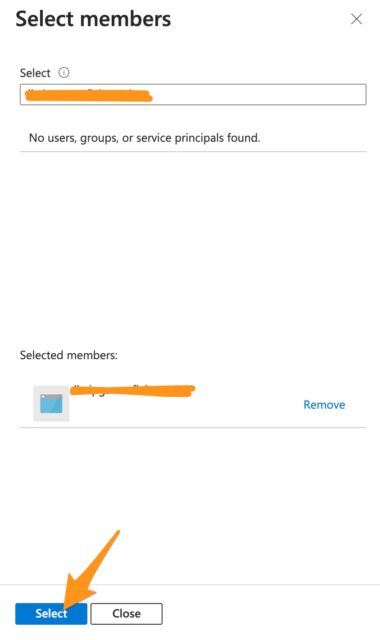
- Select User, group, or service principal
- Click on + Select members and look for the previously created Snowflake app by pasting the part before the underscore (“_”) of the previously noted AZURE_MULTI_TENANT_APP_NAME
- Click on the app and click Select at the bottom
Notification Integration Role Assignment Snowflake App - Click on Review + assign and then Review + assign again
- Look for “Storage Queue Data Contributor” by using the search bar and click on the role to highlight it
Create Snowflake Stage and Verify Storage Integration
- Create a SNOWFLAKE STAGE
- For this, we will use the CREATE STAGE command in Snowflake (make sure you have selected a role with the necessary grants to create an integration. If you’re unsure, select the ACCOUNTADMIN role)
- Go back to your SQL worksheet in Snowflake and execute the following command
USE SCHEMA <your_database>.<your_schema>;

CREATE STAGE <name_of_your_stage>
  URL = 'azure://myaccount.blob.core.windows.net/mycontainer/load/files/'
  STORAGE_INTEGRATION = <name_of_your_storage_integration>;
- replace <your_database> and <your_schema> with the respective locations where you want to ingest data later from the external stage.
- Provide a useful name for the stage
- Replace the URL with the URL of your container but be sure to keep the “azure://” in front instead of the “https://”
- Lastly, provide the name of the storage integration you created earlier.
- Upload a test file to the blob container (eg. a .csv file with a few rows and columns of sample data)
- Then run the following statement in Snowflake and replace the values with yours
ls @”<DATABASE_NAME>.<SCHEMA_NAME>.<STAGE_NAME>;’
- If the storage integration and external stage work correctly, you should see the file you just uploaded to the Azure Blob Container in the Snowflake output
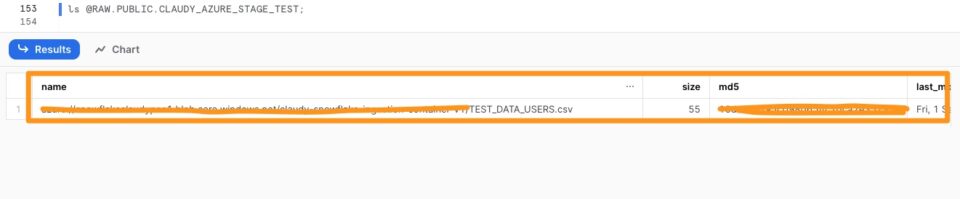
Snowflake ‚ls‘ Command to List Files in External Stage
Create Snowpipe for Continuous Data Ingestion
- Create a Snowflake Table first where the data will be ingested
- Go back to your SQL worksheet in Snowflake
- Use the CREATE TABLE command to create a table with the same number of columns as the file you uploaded to the Azure Blob Container – this could look like the following
CREATE OR REPLACE TABLE RAW.PUBLIC.USERS_TEST (
    ID STRING,
    FIRST_NAME STRING,
    LAST_NAME STRING
);
- Create Snowpipe for Automatic Data Ingestion
- For this, we will use the CREATE PIPE command in Snowflake
- Go back to your SQL worksheet in Snowflake
- Execute the following command and replace the parameters with your own respective values
CREATE OR REPLACE PIPE <YOUR_PIPE_NAME>
  AUTO_INGEST = TRUE
  INTEGRATION = 'YOUR_NOTIFICATION_INTEGRATION'
  AS COPY INTO <YOUR_DB>.<YOUR_SCHEMA>.<YOUR_TARGET_TABLE>
  FROM @<YOUR_DB>.<YOUR_SCHEMA>.<YOUR_STAGE>
  FILE_FORMAT = (TYPE='CSV');
- Run
ALTER PIPE <YOUR_DATABASE.YOUR_SCHEMA.YOUR_PIPE_NAME> REFRESH;to trigger the pipe again. This should ingest the data from the file in your Azure Blob Container into the target table that you have defined in Snowflake. - Check if the data has been loaded by running
SELECT * FROM <YOUR_DATABASE.YOUR_SCHEMA.YOUR_TARGET_TABLE> - If the data has been loaded successfully, you should see the data in the results output in Snowflake
Conclusion
This concludes the 2023 step-by-step guide on how to set up your enterprise-ready continuous data ingestion pipeline with Azure Blob Containers and Snowflake. If you run into any issues or have questions concerning your data project, do not hesitate to reach out to us.